Read our latest blog post: How to Polish Natural Stone Floor Tiles -... https://t.co/O69OST4vZH
— Floor ReNew Houston (@floorrenew) August 31, 2016
Read our latest blog post: How to Polish Natural Stone Floor Tiles -... https://t.co/O69OST4vZH8/31/2016
0 Comments
When it comes to polishing your natural stone flooring, there is an entire process to accomplish before reaching this stage. Polishing is what brings out the natural shine in your stone tiles. This is usually the second to last step in the restoration process.
Before you can even begin to do the polishing process, it is best to start the entire restoration process. And that starts with cleaning your natural stone floors and getting them ready for the first phase of restoration.
You will first need to take a soft-bristled broom and sweep up all of the dirt and debris throughout the area. Next you will want to use an un-treated dust mop to sweep up any dust and small particles you may have missed with the broom.
From there you will need a bucket, a soft wet mop, and cleanser of some kind. With the cleanser you need to make sure that it is one that can be used on your natural stone. Some natural stones cannot handle specific cleansers like ones that are acidic or alkaline. Make sure that your cleanser is one that will not cause any damage to your stone tiles.
You need to fill the bucket with warm water and after consulting the back of the cleanser bottle, pour in the appropriate amount needed. As you start mopping, make sure to cover the entire area. The cleaning solution needs to set on top of the surface for about 10 to 15 minutes so that the cleanser can loosen up all the dirt and grime.
During this time frame you need to make sure that you keep the area wet and that it is not drying. You do not want it to dry and that dirt be back on the tiles.
After it has set, dump the dirty water out of the bucket and rinse it and the wet mop thoroughly, and then refill it with warm water. Then start mopping up all the dirty water being sure to empty and refill the bucket with fresh water regularly.
After all traces of cleanser and dirty water has been removed, allow the area to either air dry, which can take up to a couple of days depending on the type of stone, or use a soft microfiber cloth to dry the area by hand.
Once the area is completely dry, now you can begin the process of restoring the stone tiles, which includes polishing your natural stone tiles. The first phase, though at times this can be skipped, is grinding. It is a very aggressive process that is using a metal-bonded and diamond grit that buffs away all deep scratches and lippage flattening the floor in the process.
The next phase, or the phase that you can start out with is honing. This is a very similar process as grinding but at a much more mild process. It takes grits that are less coarse to complete this process that removes any minor scratches and etch marks. This will also flatten the floor as well.
Now comes the phase of polishing the stone tiles. What this does is using higher grits or a combination of higher grits to run along the tiles and bring out the shine.
To maintain this shine and luster is the final phase of applying sealant to the stones. Applying a high quality sealer will help protect the tiles as well as slow down the absorption rate of any liquid spilled on the tiles.
This completes the entire process of restoration and how to polish the natural stone floors. This traditionally needs to be done every 5 to 10 years depending on how well you maintain the cleaning as well as how much traffic runs through the area.
When in doubt contact a professional, contact us today to schedule your appointment to polish your natural stone flooring or if you have any questions. Floor ReNew Houston 4530 W. 34th Street Suite C Houston, TX 77092 (713) 418-9983 via Floor ReNew Houston http://ift.tt/2aDbngU 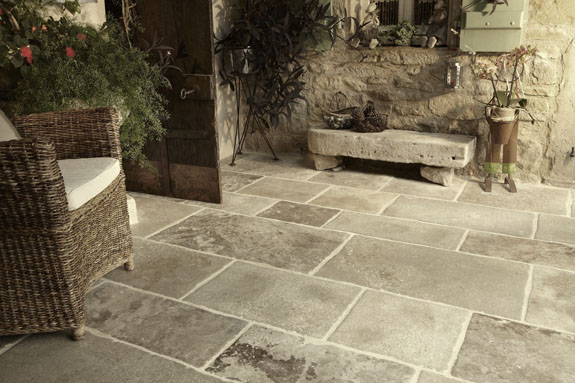 When making a decision on which natural stone flooring is best for your needs and wants, doing as much research on each one is route to go. Each stone is different and unique in its own way, and knowing the differences and figuring out if it’s the right one for you is important.
When hearing porosity, this is referring to the size and amount of pores that is within the stone. This affects the strength of the stone as well as how stain resistance it naturally is. If you are looking to install natural stone in your kitchen, bathroom, or even mudroom that are all high traffic areas, you will need to consider a stone that is hard and dense that is nonporous like slate or granite. You will find that the softer and more porous stones like limestone, marble, and travertine do require regular applications of sealant as well as frequent cleaning that helps prevent any staining or pitting to happen. You will find that all natural stones come in a large variety of colors and even patterns. When looking for a specific color or design, keep in mind that how rare the color or design is, the higher in cost it would be. Let’s learn a bit more about each different natural stone tile. Limestone has a natural and earthy appearance due to it being formed from sedimentary materials such as shells and coral. This is a stone that when it is cut from the same slab, there is little color variation from tile to tile. Its surface can be sanded down to give a refined look, or perfectly smooth, or even a machine-tumbled type worn look. This is one stone that you can use in a room that is prone to have liquids or solid foods spilled on it that may contain acid, though you will need to have it sealed in order to make sure it lasts for years to come. Slate is a natural stone that has rustic and classic look that is available in geometric pieces or irregular shapes. Its usual colors are soft reds, dark grays, and medium greens. Granite is available in so many different varieties of colors and designs. It is a highly popular choice when it comes to bathrooms and kitchens, mainly due to it being a slip-resistant tile. Marble is a rather porous stone that is a classic choice for those formal spaces within your home. It is best used in spaces that are not high traffic areas as it can be easily scratched. The tiles come in many different colors, though this depends on which quarry. Different marbles can be harder than the other as well as more stain resistant, so be sure when you are purchasing marble, which type it is. Travertine is a limestone that has a more crystallized look to it and is very often mistaken as marble. Make sure to do your research before deciding on just which type of stone flooring is right for you. You want to keep in mind which are more maintenance when it comes to clean as well as protecting and extending its lifespan. If you are someone that does not like to clean your floors regularly, there are some stone tiles that are not meant for you as they would need that done often. Or if you do not wish to worry about sealing your stone tile floors every few years, some other stones are not meant for you. Figure out which ones meet the needs and wants that you and your family desire. When in doubt contact a professional, contact us today to schedule your appointment to polish your natural stone flooring or if you have any questions. http://www.google.com/+Floorrenewhouston Floor ReNew Houston Natural Stone Restoration 4530 W. 34th Street Suite C Houston, TX 77092 (713) 418-9983 www.floorrenewhouston.com https://www.facebook.com/floorrenew One thing that you will find that due to everyday use and traffic, you will start noticing wear and deterioration on your natural stone floors. And without knowing the proper cleaning and maintenance that your floors need can leave them looking dull, worn, and dirty.
That is where the refinishing or restoration process comes in. It is about bringing back your natural stone flooring’s beauty back into it. It is best to always do your research on your specific stone tiles whether they be granite, marble, slate, or many others. Each one has its own specific weakness to certain cleanser, so be sure to study up as it can cause more damage than good.
The restoration process begins with cleaning. You will need to use a soft-bristled broom to sweep up all dirt and debris. From there, you will need to use an un-treated dust mop and sweep up all dust and small particles that the broom missed.
The next steps would be to fill a bucket with warm water and with your choice of cleanser, after reading the label, pour in the appropriate amount of cleanser into the water. Taking a wet mop, start mopping the stone tiles. After you have mopped the entire area, allow it to set for 10-15 minutes so that it gives the cleanser time to loosen any dirt or grime while making sure that the area does not dry.
Then you will need to dump the dirty water out and rinse both the bucket and wet mop thoroughly. Refill the bucket and use the wet mop to start mopping up the dirty water. Make sure to empty and refill the bucket periodically so that you are not just pushing around dirty water.
Allow the area to air dry, but make sure that it is completely dry. This can take anywhere from a couple hours to a day or two depending on what kind of stone tiles you have. If needed, you can use a soft microfiber cloth to dry the area.
Once the entire area is completely dry, now begins the restoration steps. First phase is the grinding method, which very aggressive. There is a metal-bonded and diamond grit that is heavy weighted that buffers out all the deep scratches and lippage. This is to flatten the floor and generally dust free.
The next phase is honing, which slightly less aggressive than grinding. The materials and grits used are not nearly as coarse though the process is the same. There are times where this can be the first phase, depending on how damaged the stone tiles are. This process removes moderate scratches and etch marks, but in a softer manner. This will also make sure the floor is flat.
Now is the polishing phase. This process brings out the shine in your stone by using higher grit and sometimes a combination of higher grit compounds.
The final phase is sealing the natural stone tiles. A high quality sealant is applied to the surface that helps protect it. This is best done once all the grinding, polishing, and honing is finished that way you are ensured the proper protection.
Thus finishing the refinishing or restoration process. This process is usually accomplished every 5 to 10 years as long as you have been staying on top of the regular maintenance. Sealant may need to be reapplied between refinishing processes.
When in doubt contact a professional, contact us today to schedule your appointment to polish your natural stone flooring or if you have any questions. Floor ReNew Houston 4530 W. 34th Street Suite C Houston, TX 77092 (713) 418-9983 via Floor ReNew Houston http://ift.tt/2aCevp1 We all know how much of an investment a natural stone floor can be to install into our home, but it always adds this beauty and character to whatever room we are placing it in. Taking care and maintaining that investment is important. Part of that maintenance and care is making sure that you have a sealant applied.
It is always highly recommended to have this done when you have the natural stone flooring installed, but you will need to have it regularly reapplied every few years depending on foot traffic.
The sealant is added protection for your natural stone tiles against scratches and slowly down the absorption rate of any spilled liquids. This is a very easy process to do yourself if you do not wish to call out a professional to do it.
There will be times where if there is a topical coating like wax or polyurethanes, that it will need to be stripped from the tiles before you take the next steps.
First and foremost is that you need to find the correct sealant and cleanser for your tiles. Depending what kind of natural stone that you chose will depend on which sealant and cleanser you will use.
Your first step is take a soft bristled broom and begin sweeping up all dirt and debris. Then use an un-treated dust mop and run it all in one direction sweeping up all of the dust and small particles.
Now you will need to take a bucket and fill it with warm water. After consulting the label on the back of the cleanser bottle, add whichever amount to the water. Take a clean wet mop and begin mopping the tiles.
As you are doing this, allow them to remain wet so that the cleanser is able to soak and help loosen all the dirt and grime. This takes about 10 to 15 minutes, but during that time you need to make sure that the area remains wet or the dirt will just dry up again.
After the cleanser has had the chance to loosen the dirt, dump the dirty water out of the bucket and rinse it and the wet mop thoroughly. Refill the bucket again with warm water and using the wet mop, start cleaning up all the dirty water and rinsing the tiles.
It is best to make sure that all the dirty water is cleaned up, so change out the water in the bucket periodically. Also make sure that all traces of the cleanser are cleaned up so that it does not leave a film.
Allow it to air dry or use a cotton or microfiber cloth to dry the entire area. This step is important before you apply the sealer to the stone tiles.
Once you have ensured that it is dry, you will just need to take your sealant and using a lamb’s wool applicator or soft cloth apply the sealant to the stone’s surface. After that, you need to leave it to completely dry before you are able to walk on it or place any furniture back down.
Make sure that you do not allow the sealer to puddle up as this can potentially stain the stones. You will need to apply a second coat of sealer and then buff it dry using a clean microfiber or cotton cloth to make sure that you remove all the excess sealer but make sure that you do not leave any streaks behind.
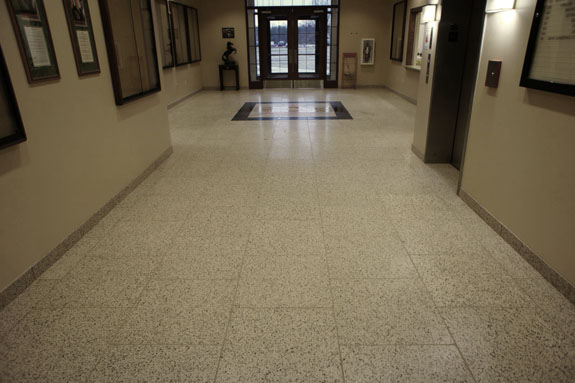
When in doubt contact a professional, contact us today to schedule your appointment to polish your natural stone flooring or if you have any questions. Floor ReNew Houston 4530 W. 34th Street Suite C Houston, TX 77092 (713) 418-9983 via Floor ReNew Houston http://ift.tt/2aZmT5r Terrazzo is made in a very unique way and has been around for several centuries. It is a tile that was created out of frugal needs than anything. The creators, Venetian marble workers, took the left over marble chips that they had and mixed it with the concrete to pour out on their terraces. It had a beauty to it and allowed them to not waste any pieces of marble.
Terrazzo is one of the more uniquely installed tiles unlike some others natural stones. In the past several decades, the installation process has further evolved to include even a few more extra steps to deliver a different look and feel that someone is possible looking for. Also, to help and ensure that the terrazzo lasts.
Thin-set terrazzo is where either ¼” or 3/8” thick resinous topping is applied directly over the subfloor. Zinc, Brass, or plastic dividers are needed to be installed above the control joints in the subfloor so that the finish does not end up cracking along the joints.
Monolithic terrazzo is where ½” of thick cementitious finish is applied right over the concrete subfloor.
Bonded terrazzo is ½” thick cementitious finish is placed over a sand-cement mortar under bed that sits on the finished concrete slab.
Sand Cushion Terrazzo is ½” cementitious terrazzo finish that is set on top of a mesh reinforced mortar under bed, which is has an isolation sheet that separates it from the subfloor.
During the installation of any of these types of terrazzo tiles the contractor makes sure that the subflooring is both even and smooth.
What mainly causes cracks in the terrazzo tile flooring is if the subflooring is unevenly which causes the tile to eventually crack under pressure. Usually when terrazzo is being installed, the professional checks for this so this does not happen.
A couple other known issues have been the concrete slab that is the subflooring has been subjected to high levels of moisture, where it was set correctly, or it did not have the chance to fully bond.
If this does happen, the best way to fix this is to have a professional come out just in case there are other areas that this can potentially happen to. What they will do is remove the tile and fix the subfloor to where it is smooth and even before installing a new replacement tile.
Another thing that a professional may do is to patch up the crack if it is a small hairline crack. This is even something that can be a DIY project that you are able to do yourself. Keep in mind though that if you are not sure what exactly caused the hairline crack, that it could potentially end up being a bigger problem down the road and lead to larger cracks. Thus it may be a subfloor issues or moisture. To protect your investment, it is always best to consult with a professional.
When in doubt contact a professional, contact us today to schedule your appointment to polish your natural stone flooring or if you have any questions. Floor ReNew Houston 4530 W. 34th Street Suite C Houston, TX 77092 (713) 418-9983 via Floor ReNew Houston http://ift.tt/2aBLCHD Before we divulge into what terrazzo tiles look like, let’s take a look at the history and where it came from. Knowing a bit more about its history and how it came to be can help us get a better idea of terrazzo.
Though some archaeologists have found some evidence of terrazzo tiling being used for floors in some old ruins in Turkey that date back about 8,000 to 10,000 years ago, we still say it originated over 500 years ago in Italy by some Venetian marble workers.
The word “terrazzo” comes from the Italian word “terrace”. It is a beautiful mosaic type material that was created out of frugality. The Venetian marble workers decided to create this due to not being able to afford marble for their own terraces.
What terrazzo tiles are made out of are chips of marble mixed in with either concrete and then left to set. Though they first realized that it was a little rough and hard to walk in, they tried to rub the surface with a stone that would make it more smooth and pleasing to walk on.
Now-a-days you can even find glass, quartz, and granite along with the chips of marble in the terrazzo tiles to create different effects. They have also changed from using concrete to using an epoxy resin with colored chips which is called a thin-set terrazzo. This allows for a faster installation process as well as a larger range of color choices.
One of the final steps is using a dry grinder on it and filling any holes to accomplish the smooth surface. It is then cleaned, polished, and then sealed, which all leaves a shiny and lovely finish.
Though the creation for this tile flooring was because it was cheaper to choose than marble, today it actually costs more than granite and marble does. Though this may be because of the actually cost for installation than just the cost to make the actual tile.
So after finding out a bit more about terrazzo’s history you get a bit more of the idea of what terrazzo looks like. It first was a mixture of concrete with marble chips and has evolved to marble, glass, granite, and other aggregates being embedded in either concrete or epoxy resin. The concrete can be tinted to certain colors, and with being able to place chips of different colors opens up the color range more.
Terrazzo has been used in many different famously known areas such as Michelangelo’s mural in St. Peter’s Basilica or in George Washington’s home in Mount Vernon. And from there it evolved to being used in other designs all the way to floors.
One of the big beauties of terrazzo tile floors is that you can do multiple different designs and colors to make it unique for your home.
When in doubt contact a professional, contact us today to schedule your appointment to polish your natural stone flooring or if you have any questions. Floor ReNew Houston 4530 W. 34th Street Suite C Houston, TX 77092 (713) 418-9983 via Floor ReNew Houston http://ift.tt/2b1KhzL |
 RSS Feed
